Building a Full-Stack Resume Site with SvelteKit, Spring Boot, and Nginx
A deep dive into the architecture behind this site — a containerized full-stack application using SvelteKit for the frontend, Spring Boot and PostgreSQL for the backend, and Nginx as a reverse proxy.
Why Build a Resume Site from Scratch?
There are plenty of website builders and templates out there, but I’ve always enjoyed building things myself just to understand how they work. This site started as a static webpage hosted on an S3 bucket, but as feature creep grew, so did the needs of the project — leading to a full backend, database, and CMS system.
The stack: SvelteKit on the frontend, Spring Boot with PostgreSQL on the backend, Nginx as a reverse proxy, and Docker Compose tying it all together.
The Frontend: SvelteKit + Tailwind CSS
The frontend is built with SvelteKit 2 and TypeScript. SvelteKit gives you file-based routing, server-side rendering, and a great developer experience out of the box. Paired with Svelte 5’s runes syntax, components are clean and reactive without the boilerplate you’d find in other frameworks.
Svelte 5 Runes in Practice: The Page Visit Counter
The best way to explain Svelte 5 runes is to look at a real component. The visit counter you see on this site is a good example because it uses $state, $derived, and $effect — three of the core runes.
<script lang="ts">
    import { onMount } from 'svelte';

    let visitCount: number | null = $state(null);
    let error: string | null = $state(null);

    onMount(async () => {
        const hasFetched = sessionStorage.getItem('hasFetchedVisitCount');

        if (!hasFetched) {
            try {
                const response = await fetch('/api/v1/new-visit', { cache: 'no-store' });
                if (!response.ok) {
                    error = 'Network response was not ok.';
                    return;
                }
                const data = await response.json();
                if (data.total_visit !== undefined) {
                    visitCount = data.total_visit;
                } else {
                    error = 'Total_visit property not found in response';
                }
            } catch (err) {
                console.error('Error fetching visit count:', err);
                error = err instanceof Error ? err.message : String(err);
            } finally {
                sessionStorage.setItem('hasFetchedVisitCount', 'true');
            }
        } else {
            visitCount = parseInt(sessionStorage.getItem('visitCount') ?? '', 10) || null;
        }
    });

    $effect(() => {
        if (visitCount !== null) {
            sessionStorage.setItem('visitCount', visitCount.toString());
        }
    });

    const formatted = $derived(visitCount?.toLocaleString() ?? null);
</script>
Here’s what each rune does:
$state(null)declares reactive state. WhenvisitCountorerrorchanges, Svelte automatically updates any part of the template that references them. In older Svelte, you’d just useletand the compiler would figure it out — runes make reactivity explicit and work consistently inside and outside components.$effect(() => { ... })runs a side effect whenever its dependencies change. Here, every timevisitCountupdates, the effect syncs the value tosessionStorage. This replaces the old$:reactive statement syntax. The key difference is that$effecttracks its dependencies automatically at runtime — ifvisitCountisnull, the body doesn’t run and no subscription is created.$derived(...)creates a computed value that updates when its dependencies change.formattedrecalculates whenevervisitCountchanges, applyingtoLocaleString()for number formatting (e.g.,1234becomes"1,234"). It’s the runes equivalent of$: formatted = ...but with clearer semantics.
The template then uses these reactive values with Svelte’s {#if} blocks to show a loading indicator, the formatted count, or an error state:
{#if error}
    <span class="text-muted">—</span>
{:else if formatted === null}
    <span class="text-muted animate-pulse">···</span>
{:else}
    <span class="font-semibold text-heading">{formatted}</span>
{/if}
The Blog System
The blog you’re reading right now is powered by mdsvex, which lets me write posts as .svx files — Markdown with full Svelte component support. Each post has YAML frontmatter for metadata like title, date, tags, and categories.
Posts are loaded at build time using Vite’s import.meta.glob:
// Eager loading for listings
const modules = import.meta.glob('/src/content/blog/*.svx', { eager: true });

// Lazy loading for individual posts
const modules = import.meta.glob('/src/content/blog/*.svx');
The blog listing page uses server-side loading to filter and sort published posts. Individual post pages use client-side dynamic imports so the full post component (including any embedded Svelte components) renders correctly. Related posts are suggested based on shared tags and categories, scored by relevance.
Resume Content
The resume itself is also written in .svx format. Professional experiences, skills, and achievements are structured as separate content files, each rendered by dedicated Svelte components. This means updating my resume is as simple as editing a Markdown file — no design work required.
The Backend: Spring Boot + PostgreSQL
The backend is a Spring Boot 3 application running on Java 21. Right now its primary job is tracking site visits, but the architecture is set up to support additional features down the road.
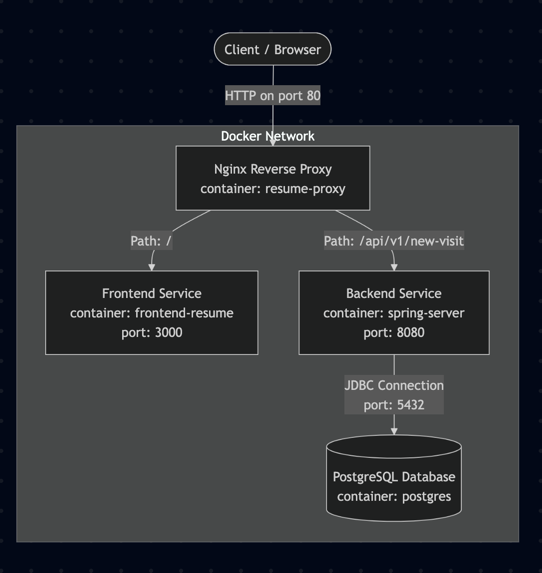
The Full API Call: From Click to Database and Back
The visit counter is a small feature, but tracing a single request through the stack shows how all the pieces connect. Here’s what happens when you load a page on this site:
Step 1 — The frontend calls the API. Inside the PageVisit component, onMount fires a fetch to /api/v1/new-visit. This is a relative URL — the browser sends it to whatever host served the page. No hardcoded backend URLs anywhere in the frontend code.
const response = await fetch('/api/v1/new-visit', { cache: 'no-store' });Step 2 — Nginx routes the request. The request hits the Nginx reverse proxy on port 80. Nginx matches the /api/v1/new-visit location block and forwards it to the backend-resume upstream (Spring Boot on port 8080). The frontend never talks to the backend directly — Nginx handles the routing, which means the frontend doesn’t need to know the backend’s port, hostname, or even that a separate service exists.
Step 3 — Spring Boot handles the request. The VisitController receives the GET request at /api/v1/new-visit and delegates to the service layer:
@GetMapping("/new-visit")
ResponseEntity<Visit> newVisit(){
    log.info("newVisit called at /new-visit");
    HttpHeaders headers = new HttpHeaders();
    headers.add("Access-Control-Allow-Origin", "*");
    return new ResponseEntity<>(visitService.getSiteVisit(), headers, HttpStatus.OK);
}
Step 4 — The service layer updates the database. VisitService retrieves the base visit record from PostgreSQL, increments the total, and saves it back. Spring Data JPA handles the SQL — the repository interface extends ListCrudRepository, so standard CRUD operations are generated automatically.
public Visit getSiteVisit() {
    Visit visit = getBaseSiteVisit();
    visit.setTotal_visit(visit.getTotal_visit() + 1);
    return visitRepository.save(visit);
}
Step 5 — The response flows back. The updated Visit entity is serialized to JSON and sent back through Nginx to the browser. The frontend receives { "total_visit": 1234, ... }, updates visitCount via $state, which triggers $derived to reformat the number and $effect to cache it in sessionStorage.
Step 6 — Subsequent visits skip the API. On page refreshes or navigation within the same session, the component checks sessionStorage first. If the count was already fetched, it reads the cached value instead of hitting the API again. This prevents a single user from inflating the count by refreshing.
The backend follows a standard layered architecture:
- Controller → handles HTTP requests and CORS headers
- Service → business logic (increment count, retrieve records)
- Repository → Spring Data JPA interface — no SQL needed for basic operations
- Entity/DTO → data model with JPA annotations and Lombok for boilerplate
Database migrations are managed by Flyway, so schema changes are versioned and repeatable. The app connects to a PostgreSQL 16 instance that persists its data via a Docker volume.
Nginx: The Reverse Proxy
Nginx sits in front of everything and routes traffic:
upstream frontend-resume {
    server frontend-resume:3000;
}
upstream backend-resume {
    server backend-resume:8080;
}

server {
    listen 80;

    location / {
        proxy_pass http://frontend-resume;
    }

    location /api/v1/new-visit {
        proxy_pass http://backend-resume;
        proxy_http_version 1.1;
        proxy_set_header Upgrade $http_upgrade;
        proxy_set_header Connection 'upgrade';
        proxy_set_header Host $host;
        proxy_cache_bypass $http_upgrade;
    }
}
All requests hit port 80 on the Nginx container. Anything under /api/v1/ goes to the Spring Boot backend. Everything else goes to SvelteKit. This keeps the frontend and backend fully decoupled — they don’t even need to know each other’s ports.
Docker Compose: Bringing It All Together
The entire stack runs with a single docker compose up. Four services, four containers:
- frontend-resume — SvelteKit app served by Bun on port 3000
- backend-resume — Spring Boot API on port 8080
- db — PostgreSQL 16 with a health check and persistent volume
- proxy — Nginx on port 80, depends on the frontend
Each service uses a multi-stage Dockerfile to keep images small. The frontend build, for example, has three stages: install dependencies, build the app, and copy only the production output into a minimal Alpine image. The backend does something similar with Maven and the Temurin JRE.
services:
  frontend-resume:
    build: ./frontend-resume
    container_name: frontend-resume

  backend-resume:
    build: ./backend-resume
    container_name: spring-server
    depends_on:
      db:
        condition: service_healthy

  db:
    image: postgres:16
    volumes:
      - db-data:/var/lib/postgresql/data
    healthcheck:
      test: ["CMD-LINE", "pg_isready"]

  proxy:
    build: ./nginx
    ports:
      - "80:80"
    depends_on:
      - frontend-resume
The depends_on with service_healthy on the database means Spring Boot won’t start until PostgreSQL is actually ready to accept connections — no more race conditions on startup.
What I Learned
Building this project end-to-end reinforced a few things:
SvelteKit is a joy to work with. File-based routing, built-in SSR, and Svelte 5’s runes make frontend development fast and intuitive. The mdsvex integration for blog content is particularly elegant (just add another .svx file and you have another blog post!).
Docker Compose simplifies multi-service deployments. Defining the entire stack in one file — with health checks, volumes, and dependency ordering — makes the gap between local development and production much smaller.
Nginx as a reverse proxy is the right default. It cleanly separates concerns, handles routing, and can be extended with SSL termination, rate limiting, or caching without touching application code.
Keep it simple. The visit counter is a small feature, but it touches every layer of the stack — frontend component, API proxy, REST endpoint, service logic, database persistence.
What’s Next
There’s always more to build. A few things on the roadmap:
- CI/CD pipeline for automated builds and deployments
- More blog content covering specific technical topics
- Daily visit tracking to supplement the running total
Check out the code on my GitHub